Page jumping, also sometimes referred to as anchor links or jump links, is where you click a link and instantly get moved somewhere further up or down a long page. The Table of Contents below is an example of page jumps.
- Why Use Page Jumps?
- Create a Page Jump
- Link to your Page Jump
- Jump Links with No Text
- Jump to a Target on Another Page or Post
- Jump Back to Top
- Page Jumps in a Navigation Menu
- Page Jumps as Footnotes
- Classic Editor / HTML Page Jumps
Why Use Page Jumps?
A page jump is a great way to link your visitors from one part of your content to another.
For example, let’s say that you have a list of names at the top of a post. You can link each name to a different spot further down in the post, so visitors can go straight to information about the particular name they are interested in. You can then link readers directly back to the list of names.
These instructions are for the WordPress Editor, or Block Editor. If you are looking for instructions for the Classic Editor or want to create the jump links using HTML click here.
Create a Page Jump
- Use the Plus Icon to add a new block.
- Select Heading as the block type, or start typing /heading as a shortcut to the heading block.
- Enter your heading text.
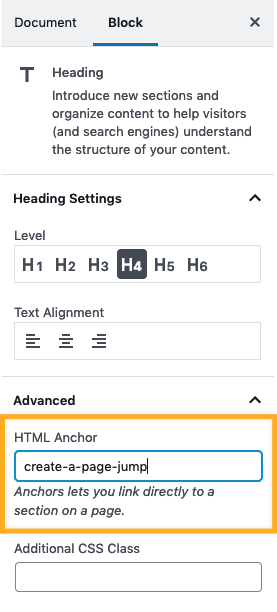
- On the right side under Block Settings, click on Advanced.
- Type a word that will become your link into the HTML Anchor field.
Make sure you have no spaces in your IDs, since that can cause problems in older browsers. Also, be sure to use a different ID for each target that you create.

Remember what you made your anchor / page jump text. You will need it in the next step.
Link to your Page Jump
- Type some text, or add an image or button that will become what you want your visitors to click on to go to another section.
- Highlight the text or image/button, and select the link option from the block’s toolbar.

- Type in the HTML Anchor you created, starting with the pound (#) symbol. For example, if you created an Anchor named create-a-page-jump you would link to #create-a-page-jump.
Now, when visitors click on the link you created, they will go to the header you added the HTML Anchor to when you created a page jump (click here to jump back to that section!)

The jump links will not work when you Preview your site. But you can test them once you Publish the site page.
Jump Links with No Text
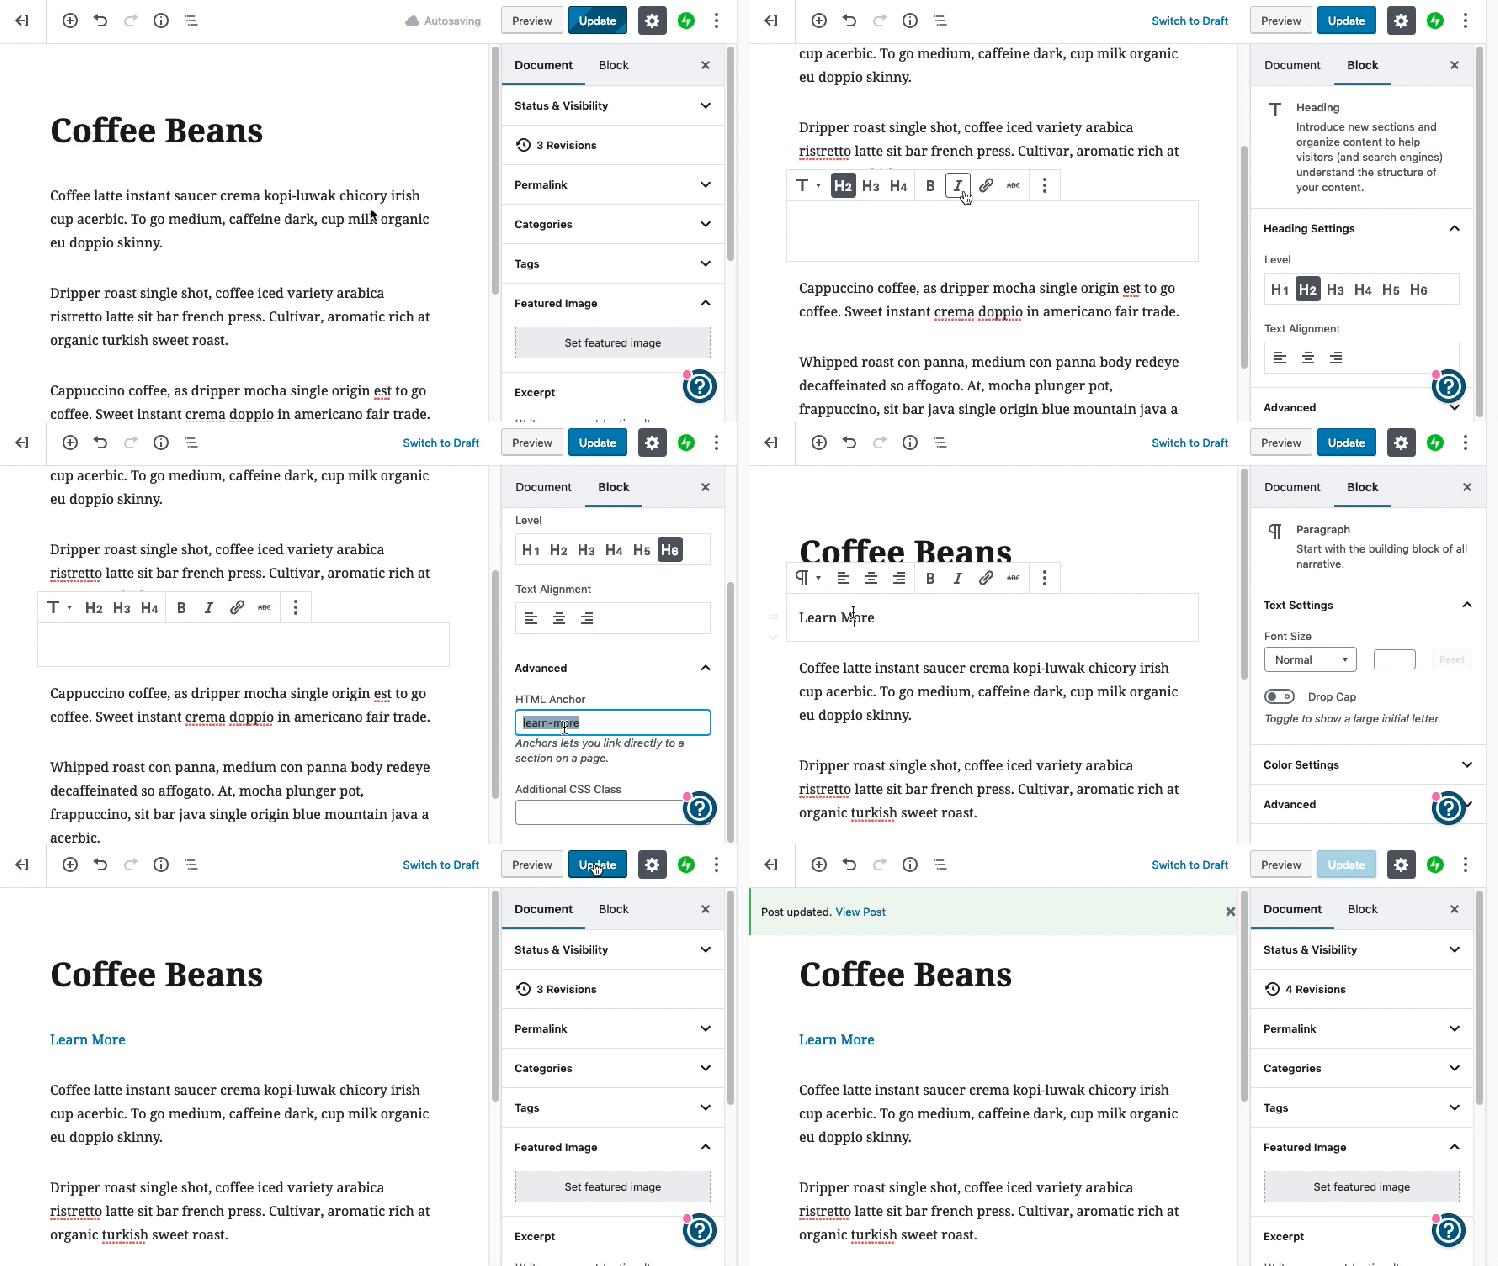
You can also create an empty header and still add an HTML Anchor to it if you do not want to display any text. To do that, add the Heading block and the HTML Anchor in the block settings, but do not type any text for the heading itself. This process is shown in the following GIF:

Jump to a Target on Another Page or Post
Page jumps don’t have to be used only for jumping within a page. You can use a page jump to link from another page to a specific area on a page.
When you view the live version of the page you created with the page jump, you can click on the link you created, and you’ll see the address of the page in your browser bar is appended with the jump link text.
For example:
- You created a page on your groovy site named Example, and the page address is yourgroovydomain.com/example
- Then, you created a jump link called unique-identifier on that page to content further down
- When you click on the jump link, your page address will change to yourgroovydomain.com/example/#unique-identifier
Now that you have the URL for the target, you can use it to link to that target from any other page or post on your site using the following format https://yourgroovydomain.com/example/#unique-identifier :

Jump Back to Top
To create a jump link back to the top of the page, you would switch the places where the HTML anchor and link text appear.
For example, at the top of your page you would add a heading with an HTML Anchor, and then lower down on your page, you would create a paragraph or button that is linked to the HTML anchor at the top of the page.
Page Jumps in a Navigation Menu
You can create a page jump from an item in your navigation menu that jumps to a specific spot on your homepage. This is common for sites that have just one long scrolling homepage. Page jumps make it easier for visitors to view the section of the homepage they want.
The first step is to add your anchor to a Heading block using the same method as described in steps 1 – 5 under Create a Page Jump above. This will be the spot to jump to.
In your menu settings, add a new item using the custom link option. In the URL field, write your anchor with a # symbol in front of it. In the Link Text field, write whatever you would like the menu item to say.

Keep in mind that a page jump like
#my-anchorwill only work on the one page that anchor is on. If you have more than one page on your site and want to make sure the page jump works on all pages, include your domain before the anchor likeyourgroovydomain.com/#my-anchor.
Page Jumps as Footnotes
See our guide on how to create footnotes using page jumps here.
Classic Editor / HTML Page Jumps
The following instructions are for the Classic Editor, or if you want to manually create page jumps using HTML code. Click here if you’re using the WordPress/Block Editor.
Create a Page Jump
The two parts of a page jump are the target text and the link.
When the link is clicked, it will bring your visitors to the place in the page where the target text exists.
The following code would be added in the HTML version of your editor.
Find out which editor you’re using.
The target text is written like this:
<p id="unique-identifier">I am the target text.</p>
The text above which says id="unique-identifier" acts as a label for your target text.
Make sure you have no spaces in your IDs, since that can cause problems in older browsers. Also, be sure to use a different ID for each target that you create.
One way to link to your target is to select some text, and then use the insert/edit link button. In the URL field there, enter the # symbol, followed by the name of the target’s ID like this:

Notice how the #unique-identifier in the link matches the ID of the target text from earlier.
If you wanted to write this link yourself in HTML code, it would look like this:
<a href="https://wordpress.com/support/splitting-content/page-jumps/view-all/#unique-identifier">Click me!</a>
You can repeat this process to create additional page jumps. Just be sure to use a different ID for each target/link pair. IDs can be anything you want, such as
"groovy"or"awesome".
Sending Readers to the Top of the Page
At the beginning of the post or page, use the Text editor to add this above all of the other HTML:
1&lt;div id="top"&gt; &lt;/div&gt;
This creates an invisible target at the top of your post or page which has top as its ID. It can be helpful to have an invisible target if you don’t actually want to add visible text to the location of the target.
Alternatively, instead of putting the ID attribute on an empty <div> tag to create an invisible target, you can add the ID to the first element on the page – such as a heading – like this:
<h1 id="top">Page Heading</h1>
You can use the insert/edit link button to link existing text to this target by putting #top in the URL field, or you can write this in the Text editor:
<a href="https://wordpress.com/support/splitting-content/page-jumps/view-all/#top">top</a>
Jumping to a Target on Another Page or Post
Once you have created an target, you can quickly access the URL which links to that target.
Let’s say that you’ve created an target on a page with this URL:
http://myblog.wordpress.com/example
All you have to do is add the # symbol followed by the target ID to the end of the URL like this:
http://myblog.wordpress.com/example/#unique-identifier
Now that you have the URL for the target, you can use it to link to that target from any other page or post on your site:

Source: https://wordpress.com/support/splitting-content/page-jumps loaded 20.08.2021